How to add a Google Maps API key to your store locator
Storemapper works with the Google Maps Platform to ensure your customers get the best possible map experience. Because that map is on your website, publicly available, and your customer uses it freely, you’ll have to have your own relationship with mapping provider (Google in this case) . This involves the creation of an account with them and generating API key or token that is linked to your map and site.
If you want to learn more about how Storemapper is using Google Maps Platform and why you need to register your map with Google, please navigate to Your store locator Google Maps License explained.
If you don’t feel comfortable following these steps, we now support an alternative map provider that has much simplier key set up process and doesn’t require you to set up billing. Proceed with Add Mapbox token to your account article.
Create Google API Key
First, let’s check whether your account has or doesn’t have a key added. Login to your account and go to Google Maps API key tab . If you see an empty field, then check instructions below.

Step 1: Sign in to your Google account. If you don’t have one, you’ll have to create it to proceed further.
Step 2: Navigate to Google Maps Platform site and press ‘Get Started’
Step 3: In the opened window you’ll be asked which API’s to enable. Check all three boxes. and click ‘Continue’


Step 4: Then you’ll be asked to create a project or select from existing ones. You can learn about what is a project here. Click on ‘+Create a new project‘ and enter some project name. Use something that makes sense to you under the project name, e.g ‘Storemapper locator’.
If you are new to Google Cloud Platform (GCP), you may land on Google Cloud Platform start up page. GCP is free, but Google will give you $300 credit/mo during free-trial 12 months so you could use various services available under the platform. After 12 months Google will just decrease this credit and you’ll be receiving $200 credit/mo.
Step 5. Fill into the form and press ‘Agree and continue’
Step 5: Enable Billing by clicking on the ‘CREATE BILLING ACCOUNT‘.
Google offers each website free map usage quota every month, which is enough for approximately 10,000 – 15,000 visits to your locator page each month (if you’re not using autocomplete feature). 99% of Storemapper clients fit into Google’s free quota, so for the majority of the clients, there are no additional costs. However, it’s always good to set up your budget threshold and billing alerts to avoid unexpected expenses. You’ll find the links at the bottom of this article.
If you don’t want to share your billing details with Google you can use alternative mapping provider then. Please procede with How to add Mapbox token to your account article
Step 6: Name your billing account and press ‘Continue‘
Step 7: In the opened window choose your country and currency, then click ‘Confirm’
Step 8: In the opened form enter your business information and add a payment card to your account.
Step 9: Now we need to create an API Key. Click here
Step 10: Click on ‘Create credentials’ -> ‘API key’
Step 11:
Add HTTP restrictions.
This is to limit your API key to just your site.
In the Application restrictions section choose ‘HTTP referrers’ and add the following items into Website restrictions.
You should wrap your domain name with asterisks. This will ensure you can place Storemapper on any subdomain or page under your domain and it will be able to use API key.
E.g *yourwebsite.com/*
Also, if you want to be able to browse your Storemapper from Preview screen under your account dashboard, we advise adding storemapper domain as well.
Troubleshooting: If after HTTP referrers addition you refreshed your locator page and saw the bouncing pin, it means that domain was added incorrectly. Make sure you’re using asterisks at the beginning and in the end of the domain name.
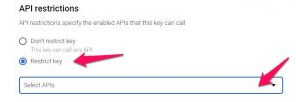
Step 12. Add API restrictions. Starting from August 30, 2019 Google will require all API keys to have API restrictions in place.
In API restrictions section choose ‘Restrict key’ and click on ‘Select APIs’ dropdown.
In the APIs list select ‘Maps JavaScript API’, ‘Places API’, ‘Geocoding API’
That’s it! Your key has been generated! Copy it, we’ll have to add it to your Storemapper account in the next step.
Add the API key to Storemapper account
Login to your Storemapper account and go to Google Maps API key tab. Paste created API key in the Google Maps API Key field and press ‘Update API Key’
Important: If you created your account earlier than June 2016 you need to re-embed Storemapper to your page. You can get it from your account dashboard.
You can check installation instructions here
You’re all set now! Below are optional steps but highly recommended if you want to have more control over your maps usage
Control your Google maps usage and manage costs effectively
For its Google Maps products, Google uses a pay-as-you-go pricing scheme, which means that its customers pay for what they actually use. Moreover, Google is giving you recurring $200 credit on your billing account each month to offset your usage costs.
We analyzed our clients’ usage and learned that the majority of them fit into $200 credit and are not exposed to any costs from Google. However, we suggest you to use the following tips to be safe from unexpected payments.
Tip 1: Know your map usage and potential costs.
Free usage credit that Google gives you each month should be enough for approximately 10,000 – 15,000 map loads per month. But still, you may want to calculate your map usage
Tip 2: Set up budgeting and billing alerts.
Budgeting is a cool feature, that Google provides you to control your billing. You can set up your budget threshold and billing alerts, that will notify you in case you’re getting closer to it. The following article will help you to set up budget and billing alerts. Set up a budget and billing alerts
If you have any questions or issues just contact us at help@storemapper.co