

Want to improve the visibility of your physical store? Want your customers to know exactly where to find your store locations? It sounds like you need a store locator for your website. This way, customers will always know where you are. You’re in luck because, in this article, you’ll learn how to add a store locator to your website in just a few steps and with no coding needed.
We're going to review:
- What a store locator is
- How to know if a store locator is right for your business
- How to choose the right store locator for your website
- How to create a store locator for your website
- Frequently Asked Questions about store locators
What is a Store Locator?
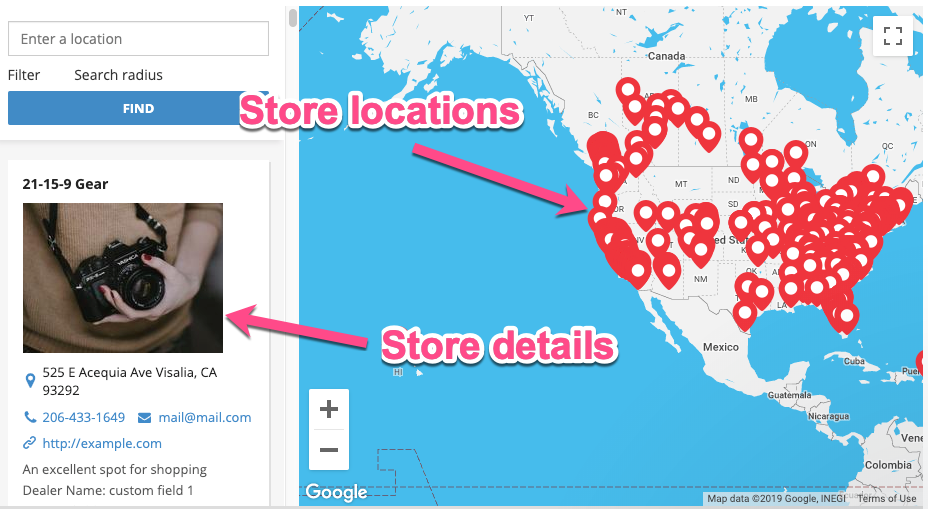
A store locator is a tool designed to help users find a physical store for a business through a handy map embedded on a company’s website. They look a little something like this:
Having an up-to-date store locator is essential for acquiring local customers.
After all, did you know that 72% of people conducting a local search will visit a store within 5 miles? That’s a lot of potential sales you could be losing out on if people can’t find your business.
Boost In-Store Traffic with a Store Locator For Your Website
Start your free, no-risk, 7-day trial today
No credit card required
How to Know If A Store Locator is Right for Your Business
When you're planning to launch a website for your business, one of the first decisions you'll need to make is whether or not to include a store locator.
A store locator can be a valuable tool for customers who want to find a nearby location, but it's not right for every business.
So, how do you know if a store locator is right for your website? There are a few factors to consider.
First, think about your customer base. If most of your customers are local, then a store locator could be helpful. However, if you sell primarily to customers far from your stores, then a store locator may not be necessary.
Second, consider the size and layout of your website. If your website is small and straightforward, adding a store locator could clutter things up and make it more difficult for visitors to find what they're looking for. On the other hand, if you have a lot of space on your website, a store locator could be helpful.
Finally, think about the cost of adding a store locator to your website. If you're on a tight budget, you may want to forego the store locator in favor of other features.
How to Choose the Right Store Locator for Your Website
If you have a brick-and-mortar business, you've considered adding a store locator to your website. A store locator can be a valuable tool for customers, helping them find the nearest location of your business. However, with so many store locator applications on the market, it can be difficult to know which one is right for your business. Here are a few things to keep in mind when choosing a store locator application:
Consider the features
First, consider the features that are important to you. Some applications offer more features than others, so choosing one that meets your needs is essential. For example, if you want customers to be able to search for stores by zip code, make sure the application you choose offers that functionality.
For example, Storemapper has some of the most features for a store locator application.
It’s mobile-friendly: you can set it up in minutes on any CMS or eCommerce platform.
It’s easy to manage locations: upload locations using our bulk uploader or sync your account with Google Drive.
It’s quick to install: just copy and paste the store locator code into your website, and you’re ready to go.
It’s highly customizable: customize virtually everything with our presets and setting options.
It includes powerful analytics: track what stores perform best and route your inventory accordingly.
Take into account the pricing
Some store locators are free, while others come with a monthly or annual fee. Be sure to compare prices and consider your budget before making a decision.
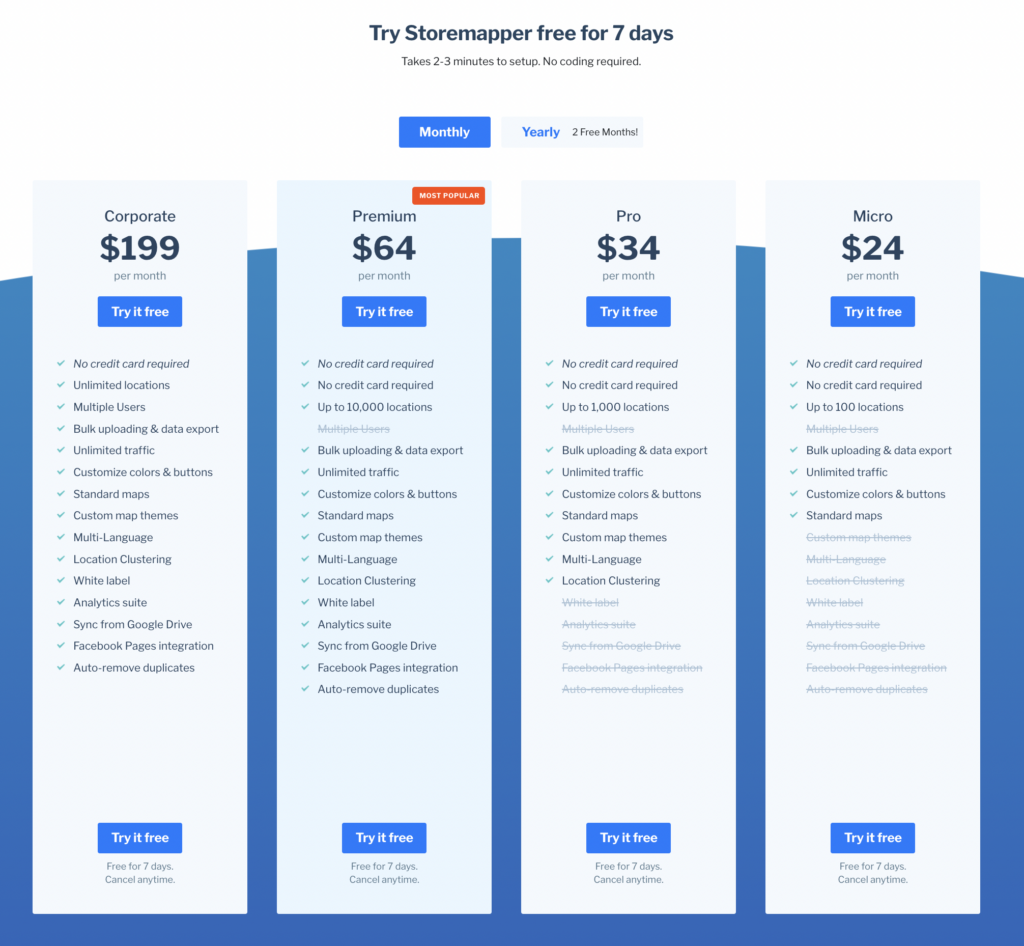
Storemapper has plans for every size, starting with our Micro plan for only $24/monthly up to our Corporate plan for $199.
If you’re not sure you want to commit, try our free 7-day trial to add a store locator for your website.
Think about ease of use
Finally, think about how easy the application is to use. You'll want an easy application for both you and your customers to use. Look for an application with a user-friendly interface and clear instructions on using it.
As far as ease of use is concerned, Storemapper takes the lead. You can upload your locations in seconds with our bulk uploader or syncing with Google Drive.
Once we’ve generated the code, just embed the store locator code into your website, and you’re ready to use it.
Adding a store locator to your site using Storemapper is straightforward:
Get More Traffic with a Store Locator For Your Website
Start your free, no-risk, 7-day trial today
No credit card required
How To Create A Store Locator For Your Website
Having a store locator embedded on your website isn’t too difficult. It can be as simple as copying and pasting some business information or uploading a spreadsheet.
Here’s how to add a store locator to your website in 3 simple steps:
Step 1: Sign up for a Store Locator App
First up, you will want to sign up to use a store locator app like Storemapper. Don’t worry; there’s a 7-day free trial, and you can install it in minutes with no coding.
Step 2: Add Your Stores
Adding locations to Storemapper is simple, and you’ve got three options; manually through the dashboard, using a spreadsheet via the CSV Bulk Uploader, or syncing to Google Drive.
Let’s quickly look at how to do all methods:
Method #1: Adding store manually using the dashboard
Firstly, log into your account, and from the dashboard, just hit Add New Store:

Then just fill in all the details. You must fill in the Name and Address fields, but it’s a good idea to fill in the other store data fields too to give customers as much helpful information as possible.
If you have lots of store data to add, doing it will take you some time to get all your stores listed. Thankfully, there is a bulk upload feature to speed this up:
Method #2: Bulk upload your store locations
If you bulk upload your store data, you need to have your locations ready in a spreadsheet.
The only requirement for Storemapper to grab your store data is that it is in .csv format. The rest is done during upload.
You can read CSV bulk uploader in the Knowledge Base.
Method #3: Google Drive Sync
The final method of uploading your store data is super handy: Google Drive Sync.
Premium Users can link a Google Sheet to a Storemapper account and sync up store data with a simple click of a button or even set it to run automatically per a daily schedule.
Just contact Storemapper and request a sync setup, and you’ll see this in your dashboard:

Once you click the Google Drive sync button, you’ll be able to manage your store data right inside your spreadsheet. You can find more about setting up Google Drive here in the Knowledge Base.
Method #4: Google Business Profile Sync
A new and efficient way to add your stores to Storemapper is through Google Business Profile integration. If you already manage your locations in Google Business Profile, you can sync them directly with Storemapper, eliminating the need for manual uploads or spreadsheets.
How does it work?
1. Connect your Google Business Profile account to Storemapper.
2. Select which locations you want to import and sync automatically.
3. Whenever you update your store details in Google Business Profile, Storemapper will keep your data up to date automatically.
To learn more about how to set up Google Business Profile Sync, follow the step-by-step guide in our Help Center.
Step 2: Copy Your Code and Customize Your Locator
Almost there now.
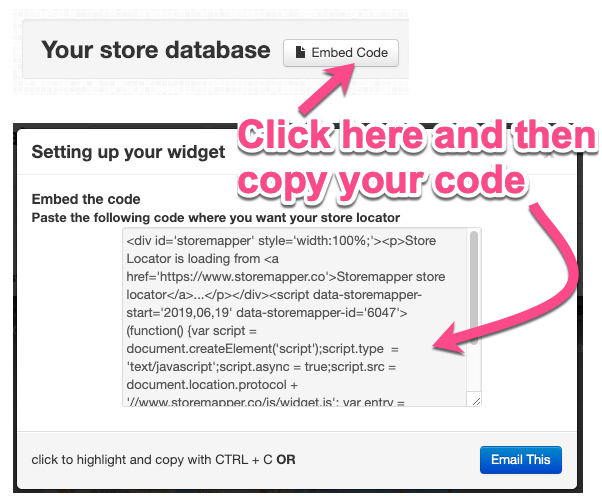
Once your store data has been added, all that’s left to do is copy your store locator HTML code and embed it on your site. (PS, Storemapper has been designed to work on any CMS or e-Commerce platform seamlessly)
Because Storemapper generates standard HTML content right on your web page, the CSS files on your site will affect how Storemapper looks, which is a big improvement over store locators that rely on an iframe.
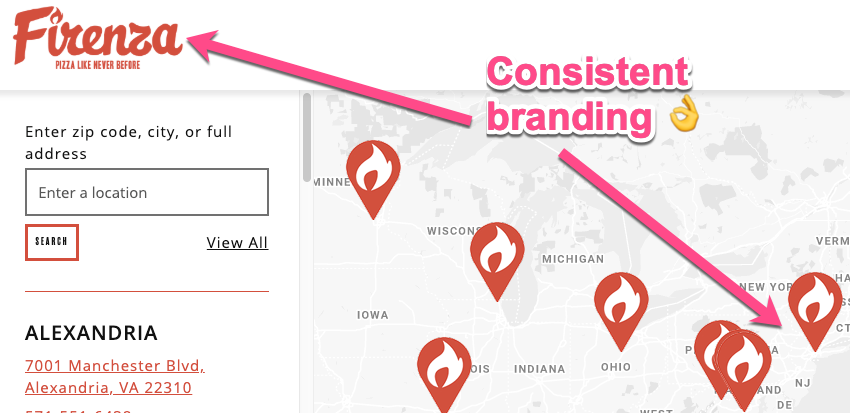
If you are using a platform like WordPress, the takeaway here is that your store locator will take on the CSS theme, helping to maintain a consistent brand across your store page and main website pages.
Of course, if you need to make some additional CSS customizations and tweaks to the design, you can do that too. However, having a store locator that looks like part of your website (and not just an afterthought) goes a long way in keeping your branding consistent.
Step 3: Embed on Your Site
The final step is to take the code and embed it on your website.
Simply copy and paste the code into your site, and you’re all ready to start driving customers to your store locations.
Once added, your map will render fully on your page from the embed code. You only have to add the code once, and changes will automatically upload to your site.
So now you know how to add a store locator to your website, let’s look at why you should in the first place:
Increase Your Store's Foot Traffic with Storemapper
Start your free, no-risk, 7-day trial today
No credit card required
Benefits of a Store Locator
According to statistics, 88% of all consumers will research the internet before purchasing at a physical store.
Across the globe, 9 out of 10 people who research a product or service online will eventually purchase in-store.
A store locator helps your prospective customers find out where your physical stores are, so they can visit and make a purchase. As a result, your in-store footfall and sales can increase.
Your business may also benefit from adding a store locator platform to its website by:
Increasing traffic to your website
Potential customers may search for your business online by using Google or going to your website directly. Either way, they may also explore it on your website.
Improving your online visibility
Since store locators are essentially databases containing rich location pages and local content, they will help to improve your business’s local search rankings.
Whether your customers specifically search for your brand or search for generic products/services in that area, your business will be more visible online with a store locator than your competitors that don’t have one on their websites.
Saving time and money
Using a store locator means your website visitors will have all the important information about your business in one place.
They won’t need to contact your business to find out the opening or closing hours or request directions. It’ll save you time and money since you won’t have to hire someone just to answer these queries.
How to Optimize Your Store Locator?
Once you’ve got your store locator live on your site, you should look at optimizing it. Here are a few ideas that might help you:
- Add local and unique content – not only does it help your customers, but it also helps improve your SEO. Include things like contact details, opening hours, and any promotions/offers specific to that store location.
- Include keywords for SEO – for higher rankings, always choose specific, local keywords instead of the general ones.
- Make the store locator mobile-responsive – today, most of your website visitors will use their smartphones to look for your store, so make it a priority to optimize your website for mobile. Storemapper comes with a mobile-friendly layout, so users do not have to do anything specific to optimize for mobile.
Frequently Asked Questions about Store Locators
What is a store locator?
A store locator is an embedded website tool designed to help users find a physical store for a business.
How can I add a store locator to my website?
Add a store locator in a simple, 3-step process. First, download Storemapper, and add your store manually by bulk upload or Google Drive sync. Then, copy your code and customize your locator. After this, embed the code on your website.
What are the benefits of a store locator?
A store locator has many benefits, but the most important is that it increases website traffic, improves online visibility, and saves you time and money.
Summary
As you can see, adding a store locator to your site doesn’t have to be time-consuming. It’s an easy way to improve the visibility of your physical stores and make it easier for customers to find you. It allows customers to search for your store locations by zip code or city and state. It also provides driving directions and contact information. Store locators are a great way to improve customer satisfaction and increase foot traffic in your physical stores. If you need more information about setting up or configuring your store locator app, check out the Storemapper Knowledge Base.

